
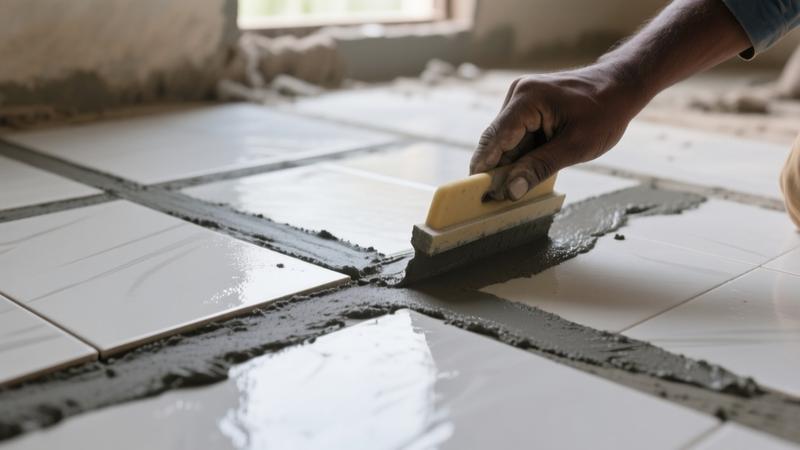
What grout is and why it matters
Grout is the powdery or premixed paste that fills the gap between two tiles. Its job is to lock the tiles together, stop water from seeping behind them, and keep the joint from moving when the floor expands or contracts.
If you skip grouting, the tiles sit on a thin bed of thinset and the joint becomes a channel for moisture, dirt and insects. In Indian homes you see cracked tiles, mouldy walls and the dreaded efflorescence - white salt deposits that appear on the surface of the grout. Most of those failures start because the joint was left open or filled with a cheap sand-cement mix that disintegrates under monsoon humidity.
Typical Indian failures:
- Water leaking under bathroom floor and rotting the screed.
- Efflorescence on kitchen backsplashes because the grout absorbed chlorides from the cement.
- Cracked tiles in balconies where the joint was too thin and could not accommodate thermal movement.
Bottom line - grout is not optional. It is the seal that makes a tiled surface last 10-15 years in our climate.
Types of grout in detail
There are several families of grout. Each has a place, a price and a set of pros and cons. Below is a quick rundown with the brands you actually find in Indian stores.
- Cement-based sanded grout - mix of Portland cement, sand (usually 1 mm to 2 mm), and a polymer or latex additive. Use for joints 1.5 mm and wider. Popular brands: Birla White Grout, UltraTech Grout, SikaGrout 150.
- Cement-based unsanded grout - no sand, just cement, fine filler and polymer. Ideal for joints up to 1.5 mm. Brands: Pidilite Grout-Plus, Mapei Ultraflex 1.
- Polymer-modified cement grout - same as sanded/unsanded but with added polymer (usually acrylic). Gives higher flexural strength and better water resistance. Laticrete SpectraLock is a good example.
- Latex-modified cement grout - latex emulsion added to the mix. Improves adhesion and reduces cracking. Ardex X 77 is a common choice.
- Epoxy grout (2-part) - resin and hardener mixed at site. Almost no water absorption, chemical resistance, and can be coloured. Downside: expensive (Rs. 350-450 per kg), short pot life (5-10 min), and tricky to apply. Brands: SikaGrout Epoxy, Mapei Kerapoxy, Laticrete SpectraLock Pro.
- Polyurethane grout - single-component, flexible, good for movement joints. Rare in Indian market, but you can get it from niche suppliers for swimming pool decks.
- Acrylic premixed grout - ready-to-use, low strength, mainly for wall cladding where the joint is decorative. Not recommended for wet areas.
- Furan grout - industrial, chemical-resistant, used in factories. Mentioned only for completeness.
All these products follow IS 15658 specifications, but the performance gap between a plain cement-sand grout and an epoxy can be 10-15 times in terms of water absorption.
Choosing the right grout
The right grout depends on where you are tiling, what tile you use and how wide the joint will be. Below is a practical matrix.
| Location | Tile material | Recommended grout type | Reason |
|---|---|---|---|
| Bathroom floor | Vitrified / Porcelain | Sanded polymer-modified cement (Birla White) | Handles wetness, resists efflorescence |
| Shower wall | Natural stone | Epoxy (SikaGrout Epoxy) | Zero water absorption, no staining |
| Kitchen backsplash | Ceramic | Unsanded latex-modified (Pidilite) | Thin joint, easy cleaning |
| Living room floor | Large format vitrified 800 mm | Sanded polymer-modified cement (UltraTech) | Joint >2 mm, thermal movement |
| Balcony | Porcelain | Polymer-modified cement with sealant | Exposure to rain, freeze-thaw cycles |
| Swimming pool deck | Slip-resistant stone | Polyurethane grout | Flexibility, chemical resistance |
Tile size also drives joint width. Use the table below when you decide joint size for different formats.
| Tile size (mm) | Recommended joint width (mm) | Grout type |
|---|---|---|
| 200 x 200 | 1 - 1.5 | Unsanded polymer-modified |
| 300 x 300 | 1.5 - 2 | Sanded polymer-modified |
| 600 x 600 | 2 - 3 | Sanded polymer-modified |
| 800 x 800 | 3 - 4 | Sanded polymer-modified |
| 600 x 1200 | 3 - 4 | Sanded polymer-modified |
| 800 x 1600 | 4 - 5 | Sanded polymer-modified |
| 1200 x 2400 | 5 - 6 | Sanded polymer-modified |
When you see a joint larger than 6 mm, think about a movement joint filled with flexible polyurethane or silicone, not regular grout.
Step-by-step grouting process
Follow these steps to avoid the usual mess.
- Surface preparation - clean the tile surface with a dry mop. Remove any thinset residue, dust or oil. If the tiles were laid on a screed that is still curing, wait at least 28 days.
- Joint depth check - use a small depth gauge. For sanded grout the depth should be at least 2 mm. Too shallow and the grout will crumble.
- Mixing
- Cement-based grout: For sanded mix use a 1 : 1.5 cement-to-sand ratio (by weight). Add water gradually - start with 0.45 L water per kg of cement. Adjust until you get a peanut-butter consistency.
- Unsanded mix: 1 : 1 cement-to-fine filler, water 0.42 L per kg.
- Polymer-modified: follow manufacturer, usually add 5 % polymer by weight of cement.
- Epoxy: Mix resin and hardener in a 2 : 1 ratio by volume. Use a clean bucket, stir for 30 seconds, then let it sit 2 minutes before applying. Pot life is 7 minutes at 25 °C.
- Application technique - scoop grout onto the tile with a rubber float. Hold the float at a 45-degree angle and push the grout into the joint, scraping off excess. Work in 1-sq-m sections so the grout doesn't dry before you clean.
- Initial cleaning - after 10-15 minutes, use a damp sponge to wipe the tile surface. Rinse the sponge every 30 seconds. Do not over-wet the joints; that can weaken the cure.
- Final haze removal - after the grout has set (about 2 hours), a thin white film may appear. Use a dry microfiber cloth or a light mist of vinegar-water (1 : 10) to polish it off.
- Curing - keep the floor moist for the first 24 hours. Lightly spray water (no standing water) and cover with a plastic sheet if the ambient humidity is low (<60 %).
- Sealing - after 72 hours, apply a penetrating sealant (e.g., Sika Grout Sealer) to cement-based grout. Epoxy does not need sealing.
Mix ratios and additives
Getting the ratio right saves you from weak joints and re-work.
- Cement:sand - 1 : 1 for narrow joints, 1 : 2 for 3 mm joints, 1 : 3 for 5 mm joints. More sand gives higher compressive strength but lowers bond.
- Water-cement ratio - 0.40 to 0.45 for sanded grout, 0.38 to 0.42 for unsanded. Too much water = shrinkage cracks.
- Latex bonding emulsion - add 5 % of the total cement weight. For a 10 kg bag, pour 0.5 L latex.
- Acrylic additive - some brands (e.g., Ardex) recommend 2 % acrylic polymer powder for extra flexibility.
- Anti-fungal additive - a few drops of copper-based biocide per litre of mix can keep bathroom grout mould-free for years.
Common mistakes
Even seasoned masons slip up.
- Grouting before the thinset has reached full strength (less than 28 days). Tiles will shift and the grout cracks.
- Using too much water - the mix turns soupy, and the cured grout shrinks, leaving gaps.
- Skipping the initial cleaning - you end up with a permanent haze that looks cheap.
- Not sealing cement-based grout - in a humid bathroom efflorescence appears within weeks.
- Choosing unsanded grout for a 3 mm joint in a balcony. It will crumble under thermal expansion.
- Ignoring perimeter movement joints. Tiles will push the grout out and you'll see cracks along walls.
- Mixing a partial batch and topping it up later. The later water changes the chemistry and you get weak spots.
- Using expired epoxy resin. The pot life drops dramatically and the colour may turn yellow.
- Applying grout in direct sunlight. The top sets too fast, leaving a powdery interior.
Indian climate considerations
Monsoon humidity (80-95 % RH) and summer roof temperatures of 45 °C stress grout in two ways.
- Water absorption - cement-based grout will soak up moisture and swell, leading to efflorescence. Epoxy or polymer-modified mixes shrink less.
- Thermal expansion - a 30 °C rise can cause a 0.02 % linear expansion in vitrified tiles. Over a 2 m strip that is 0.4 mm - enough to open a joint if the grout is too stiff.
- Seepage - poor joints let rainwater travel under the floor, rot the screed and cause mould on walls.
- Mould growth - if you skip anti-fungal additives, bathroom grout becomes a black carpet in 3-4 weeks.
My rule of thumb: for any wet area, use a sanded polymer-modified cement grout with a sealant, or go epoxy if budget allows. For outdoor decks, use polyurethane or a cement-sand mix with a flexible sealant.
Re-grouting existing tiles
When grout crumbles, stains or loses water resistance, it's time to re-grout.
- When to re-grout - visible cracks, mould, or after a water leak repair.
- How to remove old grout - a manual grout saw works for small areas. For 100 sq ft bathroom, an oscillating multi-tool with a grout removal blade cuts time by half. Expect to spend Rs. 1,500-2,000 on tool rental.
- Cost estimate - a 10 kg bag of sanded polymer-modified grout costs Rs. 350-400. For a 100 sq ft bathroom (average joint volume 2 kg), you need 3 bags = Rs. 1,200. Add Rs. 500 for sealant and Rs. 800 for labour. Total roughly Rs. 2,500-3,000.
IS code and standards
All reputable manufacturers label their product to IS 15658 - "Specification for Grout". The code defines compressive strength (minimum 10 N/mm2 for sanded, 8 N/mm2 for unsanded), water absorption (<10 %) and colour consistency.
Supporting standards:
- IS 1542 - "Specification for Fine and Coarse Aggregate for Concrete". The sand used in grout must meet zone-II grading.
- IS 269, IS 8112, IS 12269 - cement grades (53 MPa, 43 MPa, 33 MPa). For grout, use IS 269 or IS 8112 for higher early strength.
Always ask the supplier for the IS certificate. If they can't produce it, walk away.
Grout colour selection
Colour is not just aesthetic; it influences perception of cleanliness.
- Matching tile colour - gives a seamless look. In Indian homes with dark vitrified flooring, a matching grey grout hides stains but also hides mould, so you must seal.
- Contrast grout - light grey or white with dark tiles creates a striking pattern. The downside is that any dirt or efflorescence is glaringly obvious.
- Dark grout - black or charcoal works with light marble or natural stone, hides stains, but can look cheap if the tile is also light.
- Epoxy colour range - epoxy can be tinted to any hue. For bathroom walls, a pastel blue or green adds a spa feel and the colour won't bleed.
My advice: for high-traffic wet areas, pick a mid-grey polymer-modified grout and seal it. For decorative living-room floors, go contrast with a light sanded grout.
Related: Door Hardware Price List India 2026: Complete Buying Guide