
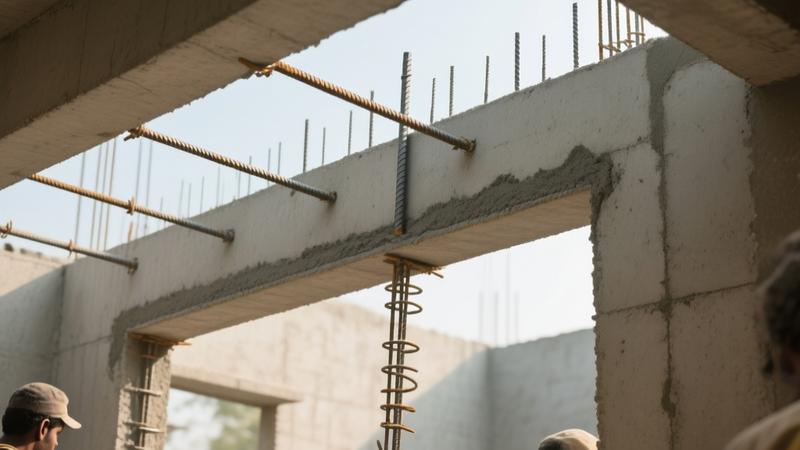
What a lintel actually is
A lintel is a horizontal load-carrying element placed over doors, windows or any opening in a wall. Its job is simple - transfer the weight of the wall (and any floor loads above) to the side walls, so the opening doesn't collapse. Think of it as a bridge for the brickwork.
Why you cannot skip a lintel
Without a lintel the masonry above the opening is left to act like a cantilever. Even a 2-storey house will develop cracks, sag, or worst-case a sudden failure when you open the door. The code (IS 456) treats a lintel as a short beam, and the same design checks apply - shear, bending, and bearing.
Common types used in Indian homes
| Material | Typical Span (mm) | Cost per metre (Rs.) | Pros | Cons |
|---|---|---|---|---|
| RCC (reinforced cement concrete) | 900-1800 | 500-800 (plain concrete) + steel 6-8 per kg | Strong, works for any span, fire-proof | Labour intensive, needs formwork |
| Brick (solid brick lintel) | 600-900 | 30-40 per brick (about Rs. 300-400 per metre) | Cheap, easy to lay | Limited to small openings, low tensile capacity |
| Steel (I-beam or H-beam) | 1200-2400 | Rs. 120-150 per kg (TMT) + fabrication Rs. 150-200 per metre | Lightweight, quick install | Corrosion risk, needs fire protection |
| Stone (granite, sandstone) | 900-1500 | Rs. 350-500 per kg (about Rs. 800-1200 per metre) | Good for heritage look, high compressive strength | Heavy, difficult to handle, expensive |
Standard size and thickness for residential lintels
For a typical 1.2 m wide door in a 2-storey house, the RCC lintel depth is 150 mm and width 200 mm. Main reinforcement uses 12 mm TMT bars at 200 mm centres, with 8 mm stirrups spaced 150 mm. If the opening exceeds 1.5 m, increase depth to 200 mm and use 16 mm main bars.
Brick lintels are usually 230 mm high, 115 mm thick and 225 mm wide, laid with a 1:2:4 mortar mix. Steel I-beams of size 200 x 100 x 6 mm can replace RCC for spans up to 2.4 m, provided you add a 25 mm concrete encasement for fire safety.
Reinforcement details for an RCC lintel
Design follows IS 456 Clause 26. Main bars are placed at the tensile face (bottom) of the lintel. A typical layout:
- Bottom steel: 12 mm bars @ 200 mm c/c (Tata Tiscon, Rs. 6-8 per kg)
- Top steel: 8 mm bars @ 300 mm c/c for crack control
- Stirrups: 8 mm @ 150 mm c/c, closed ties, to resist shear
Clear cover of 25 mm is mandatory. For high seismic zones, increase stirrup spacing to 100 mm and use 12 mm main bars.
IS 456 bearing requirements
Both ends of the lintel must rest on concrete that can take at least 0.5 x fck (characteristic compressive strength). For a 20 MPa concrete, that means a minimum bearing width of 150 mm on each side. The bearing length should be at least 2 x depth of the lintel (so a 150 mm deep lintel needs 300 mm bearing). If the wall is weak, provide a plinth beam or a concrete bearing pad of 200 mm thick.
When to pick which lintel
Brick lintel - good for small windows up to 750 mm, low budget projects, and when you have skilled masons. It fails quickly if you later increase load.
RCC lintel - the workhorse. Use for any door, window larger than 900 mm, or when the wall above carries floor slabs. It tolerates heavy loads and seismic forces.
Steel lintel - ideal for precast panels, quick-build apartments, or when you need long spans (over 2 m) without thick concrete. Remember to protect against rust.
Stone lintel - only for heritage homes or when you want a specific aesthetic. Structural capacity is similar to brick, so keep spans short.
Common site mistakes homeowners see
- Undersizing the lintel depth - many contractors use 100 mm for a 1.5 m opening, which violates IS 456 and leads to cracks.
- Skipping bearing pads - the lintel rests directly on brick, reducing effective bearing and causing settlement.
- Using low-grade steel - buying 415 MPa bars for a lintel is a cheap trick; you need 500 MPa (TMT) for any tensile work.
- Improper curing - concrete left uncured for 7 days loses up to 30 % of its strength, making the lintel weak.
- Mixing brick and RCC without proper key - you'll see a step joint that cracks under load.
One of the most common frauds is to charge for a "RCC lintel" but deliver a brick lintel with a thin concrete topping. Verify the bar size on site; a simple ruler check will expose the cheat.
How to avoid these pitfalls
Ask for the bar bending schedule before work starts - see our Bar Bending Schedule (BBS) for House Construction 2026 - Complete Guide. Inspect the bearing pads and confirm they are at least 150 mm wide with a clean concrete surface. If you're unsure about the contractor's quality, use the Construction Quality Inspection Checklist for Homeowners 2026 during the lintel pour.
Bottom line
Pick a lintel that matches the opening width, expected load, and budget. Never compromise on bearing width or steel grade - the cost of a failure is far higher than the few thousand rupees saved on a cheap lintel. Inspect, demand proper documentation, and you'll have a doorway that stays solid for decades.
Lintel vs Sunshade vs Chajja - What's the Real Difference?
A lintel is a horizontal load-bearing member that sits directly over an opening. A sunshade (or over-hang) is just a slab projection meant to block harsh sun; it carries no structural load from the wall above. A chajja is a decorative extension, usually brick or concrete, that sits on top of the lintel and may have a slight bearing function if it's massive enough, but most of the time it's just a rain-shield.
Structurally, the lintel transfers roof or floor loads to the side walls. The sunshade rests on the lintel or on a dedicated cantilever beam. The chajja may be tied to the lintel with steel angles or dowels, but you should never rely on a chajja to replace a proper lintel. Skipping the lintel and counting on a chajja is the most common fraud I see on site - the wall cracks, the whole facade sags.
How a Lintel Connects to the Plinth Beam and Roof Slab for Earthquake Stability
During a quake, lateral forces travel through the floor slab, down the plinth beam, and finally into the lintel before reaching the side walls. If the lintel is not firmly tied to the plinth beam, the opening becomes a weak point and the wall can separate.
- Provide a 12 mm steel plate on each side of the lintel, bolted to the plinth beam with M12 high-strength bolts.
- Embed the lintel ends 150 mm into the plinth beam concrete and give a minimum 25 mm lap of rebar into the beam.
- Use shear studs or headed bars to link the lintel to the roof slab reinforcement - this creates a continuous load path.
Following IS 456:2000, the shear capacity of the lintel-to-plinth connection should be at least 0.6 gamma Vmax. In practice, I ask contractors to design the connection for 1.2 kN per metre of lintel width - better safe than sorry.
RCC Lintel Cost Breakdown per Metre in 2026 (Metro vs Tier-2)
| City | Concrete (M20) Rs./m3 | Steel (TMT, 12 mm) Rs./kg | Formwork Rs./m | Total Approx. Rs./m |
| Mumbai | Rs. 7,200 | Rs. 70 (Tata Tiscon) | Rs. 1,200 | Rs. 13,500 |
| Delhi | Rs. 6,800 | Rs. 68 (JSW) | Rs. 1,100 | Rs. 12,800 |
| Bengaluru | Rs. 6,500 | Rs. 66 (Kamdhenu) | Rs. 1,050 | Rs. 12,200 |
| Lucknow | Rs. 5,900 | Rs. 62 (Virinchi) | Rs. 950 | Rs. 10,800 |
| Hyderabad | Rs. 6,200 | Rs. 64 (Tata Tiscon) | Rs. 1,000 | Rs. 11,300 |
| Tier-2 (e.g., Kota) | Rs. 5,400 | Rs. 60 (Virinchi) | Rs. 850 | Rs. 9,700 |
These numbers assume a 200 mm wide, 150 mm thick lintel with 2 % steel content. Add Rs. 500-800 per metre for transport and handling if the site is difficult to access.
Window Lintel vs Door Lintel - Design Tweaks You Must Know
A window opening is usually 1.2 m to 1.5 m wide, while a door can be 0.9 m (single) to 1.2 m (double). The larger the opening, the deeper the lintel must be to avoid excessive deflection.
- For windows up to 1.5 m, a 150 mm thick RCC lintel with 2 % steel suffices.
- For a 2.4 m wide double door, increase thickness to 200 mm and raise steel to 2.5 %.
- Provide a minimum bearing of 150 mm on each side for doors, 100 mm for windows - doors carry more live load from foot traffic.
Never cut corners on a door lintel - a cracked lintel under a bedroom door is a nightmare you'll pay for later.
Inspection Checklist Before the Concrete Is Poured
Walk the site with a clipboard and tick every item. Missing even one can turn a good lintel into a disaster.
- Formwork: check for 10 mm gaps, proper bracing, and release agent applied evenly.
- Reinforcement: verify bar size, spacing, and that all bars are tied with steel wire. Confirm lap length matches design.
- Cover: measure concrete cover - 25 mm minimum for lintel, 20 mm if using corrosion-resistant steel.
- Alignment: ensure lintel is level, plumb, and that the bearing length matches the drawing.
- Cleanliness: remove debris, oil, and loose mortar from the bed.
- Anchorage: check that steel plates or dowels are correctly positioned and bolts tightened to 70 Nm.
- Pre-stress (if any): verify jacking pressure and that stress is within 80-90 % of design.
Take photos of every step and ask the contractor to sign the checklist. If something looks off, stop the pour and fix it - the cost of re-pouring a 2 m lintel is nothing compared to a cracked wall later.
Related: 10 Ways to Make Your Home Look More Expensive Without Spending a Fortune
Related: Ways to make uPVC Door More Secure
Recommendation: For any opening wider than 1.2 m, insist on a 200 mm thick RCC lintel with at least 2.5 % steel and a 150 mm bearing on each side - it saves you from a cracked wall and a sleepless night.