
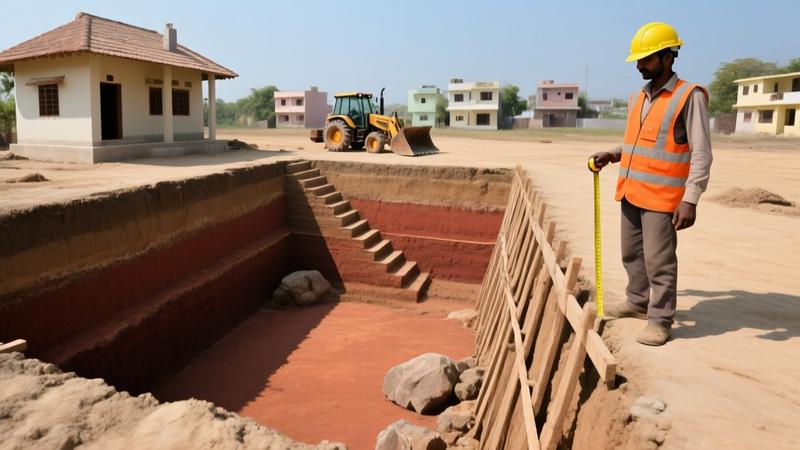
How deep should you dig? Soil, frost line and load bearing
Depth is not a guess-work number you pull from the internet. It comes from three things - the bearing capacity of the soil, the type of foundation you plan (strip footings, raft or pile), and the local frost line. In most parts of peninsular India the frost line is nil, but in north-west districts like Jammu & Kashmir you need at least 1.2 m below ground to avoid frost heave.
For a typical 150 sq m single-storey house on black cotton soil, the safe depth is 1.0 m to 1.2 m. Laterite in the Western Ghats often requires 1.5 m because it loosens when wet. Alluvial soil of the Ganga basin can be as shallow as 0.8 m if a 150 kPa bearing capacity is confirmed by a plate load test. Sandy soil near the coast needs 1.3 m to reach the denser layer below the loose top 30 cm.
Rocky ground - you either dig to the rock surface and anchor the footing into the rock, or you use a shallow spread footing of 0.6 m and rely on the rock's high bearing capacity. The rule of thumb I use on site: never let the bottom of the trench be higher than the expected water table plus 0.3 m, otherwise dewatering becomes a nightmare.
Trench width, footing layout and the geometry you cannot ignore
Width is dictated by the footing size and the need for workers to move safely. For a 300 mm wide strip footing you should give at least 600 mm of side clearance on each side, making the trench width 1.5 m for a 300 mm footing. If you are laying a raft footing of 1.2 m thickness, the trench width jumps to 2.0 m to accommodate formwork and reinforcement handling.
Here is a quick reference table for common footing sizes:
| Footing width (mm) | Recommended trench width (m) | Typical depth (m) |
|---|---|---|
| 200 | 1.2 | 0.8-1.0 |
| 300 | 1.5 | 1.0-1.2 |
| 400 | 1.8 | 1.2-1.5 |
| 600 (raft) | 2.0 | 1.5-2.0 |
Remember to align the trench with the structural grid drawn by the architect. Mis-alignment adds extra concrete work and weakens the load path.
Shoring, dewatering and keeping the pit dry
Shoring is not optional when the trench exceeds 2 m depth or when the side soil is loose. I prefer steel sheet piling for depths up to 3 m because it's reusable and gives a clean wall. In regions with laterite, timber soldier piles with lagging work fine and cost about Rs. 150 per meter.
Dewatering is a pain point in monsoon-prone zones. A simple well point system using a 2 inch PVC pipe and a small centrifugal pump (e.g., Kirloskar KDP-750) can handle a 1 m water table rise. For larger sites, a 5 kW submersible pump (Crompton 5 kW) placed in a sump pit will keep the water level 0.5 m below the trench bottom.
Never rely on bucket-type dewatering for a foundation that will stay wet for more than a week. The concrete will lose strength and you'll be fighting cracking later.
Equipment choices - JCB, excavator, poclan or manual labor
Choosing the right machine saves time and money. A JCB 3DX (3-ton) costs around Rs. 2,500 per hour in Delhi, including operator. It can dig a 1 m deep, 1.5 m wide trench in about 30 minutes for a 30 m run. For larger jobs a Caterpillar 320D (20-ton) at Rs. 5,000 per hour will finish a 150 m trench in under 4 hours.
If the site is cramped, a poclan (mini-excavator) of 1.2 ton capacity (Mahindra 1250) is perfect. Rental rates are Rs. 1,200 per day plus fuel. Manual digging with pickaxe and shovel is still common in villages; a team of 4 labourers can achieve 0.5 m depth at about Rs. 300 per day per head, but expect the schedule to stretch.
Don't forget to factor in fuel - diesel for a JCB 3DX is about Rs. 90 per litre, and it consumes roughly 8 litres per hour at idle.
Safety code, IS 3764 and on-site rules you must obey
IS 3764 lays down the safety requirements for excavation and shoring. The key points are:
- All trenches deeper than 1.2 m must have a protective system - either shoring, shielding or sloping.
- Sloping angle for cohesive soil (black cotton) shall not be steeper than 1:1.5, for non-cohesive soil (sand) 1:1.0.
- Access ladders must be placed within 2 m of the trench edge, with a rise of 150 mm per step.
- Daily inspection of shoring and dewatering equipment is mandatory.
- Personal protective equipment (hard hat, steel toe boots, high-visibility vest) is compulsory for all workers inside the pit.
Violating these clauses can attract a fine of up to Rs. 50,000 per day and, more cause fatal accidents. I have seen a contractor skip shoring to save Rs. 5,000 and end up with a collapsed wall that cost Rs. 3 lakhs to fix.
Common mistakes that bleed your budget
Here's a blunt list of what I see over and over:
- Under-estimating depth. Cutting depth by 20 cm to save excavation cost leads to settlement later.
- Using the wrong soil classification. Calling laterite "rock" and skipping dewatering is a recipe for water seepage.
- Skipping compaction of the sub-grade. Many builders pour concrete on loose soil; the result is cracks in the slab.
- Improper shoring. Wooden planks without proper bracing collapse under rain-softened soil.
- Relying on a single pump for a high water table. Pump overload causes breakdown and delays.
- Not budgeting for extra 10-15% for unforeseen ground conditions. The surprise is always there.
Read more about footing related blunders in Footing in House Construction 2026 - Types, Size, Reinforcement and Common Mistakes. Also check the broader mistake list at Common Construction Mistakes to Avoid During House Building in India 2026.
FAQs - quick answers for the everyday builder
Q: How much does a typical 100 m trench cost?
A: For a 1 m deep, 1.5 m wide trench, manual labour (4 men) will cost around Rs. 12,000 for 2 days. A JCB 3DX will charge about Rs. 5,500 for the same job, including fuel.
Q: Do I need a licensed engineer to sign off the excavation?
A: Yes. IS 3764 requires a qualified civil engineer to certify the shoring design and the final depth before concrete is placed.
Q: Can I reuse the excavated soil for backfilling?
A: Only if the soil is clean and free of contaminants. Laterite often needs to be screened; black cotton soil should be mixed with sand to improve stability.
Q: What is the safe slope for a 2 m deep trench in sandy soil?
A: 1:1 (45 degrees) is the maximum. Anything steeper risks a sudden collapse.
Q: How long should I wait after dewatering before pouring concrete?
A: Ideally pour as soon as the water level is at least 0.3 m below the bottom of the trench and the soil is firm. Waiting more than 24 hours can let moisture rise again.
Excavation is the first real step that decides whether your house will stand firm or develop cracks. Get the depth right, respect the soil, use proper shoring, and never cut corners on safety. The extra rupees you spend now save lakhs of repair later.
Dewatering methods when water seeps into the pit
In many parts of north-east India and the coastal belt, the water table sits at 1.0-1.5 m depth even in the dry season. When you hit that level, the pit fills faster than you can pour concrete. The three work-horse methods I rely on are:
- Well-point system. Install 0.5 m long PVC well-points every 0.6 m along the trench perimeter, connect them to a suction manifold, and run a 2-inch centrifugal pump (Kirloskar KDP-750 or KDP-1000). For a 30 m long, 1.5 m wide pit you need roughly 50 well-points, consuming about 120 kW-hr of electricity per day. Rental cost for the pump + manifold is Rs. 6,500 per day in Kolkata; add a diesel generator if mains supply is unreliable (â Rs. 4,000 per day for 5 kW generator).
- Sump-pump method. Dig a 1.2 m deep, 0.8 m wide sump at the low point of the pit, line it with HDPE sheet (2 mm thick) to prevent infiltration, and place a submersible pump (Crompton 5 kW, model C5-5) inside. The pump discharges to a nearby drainage ditch or a concrete-filled pit. One pump can handle up to 800 L/min; for larger pits stack two pumps in parallel. Expect Rs. 3,200 per day for pump rental plus Rs. 250 per day for sump liner.
- Sheet-pile cutoff wall. When the water table is high and the soil is soft (e.g., laterite), drive interlocking steel sheet piles (e.g., Tata Steel 0.9 m x 2.4 m) around the perimeter to a depth 0.5 m below the expected water level. This creates a dry pocket inside the pit and reduces pump run-time by 40-60 %. Steel sheet piles cost about Rs. 1,100 per linear metre; a 30 m perimeter wall will be Rs. 33,000 plus a one-time labor charge of Rs. 8,000.
Rule of thumb: start dewatering as soon as you breach the water table, keep the water level at least 0.3 m below the pit bottom, and run the pump continuously for 6-8 hours before you start concrete work. Any pause longer than 12 hours invites seepage, which will ruin the fresh PCC and force you to re-compact the sub-grade.
Soil bearing capacity table for Indian soil types with required footing widths
| Soil type (IS-2720) | Typical bearing capacity (kPa) | Recommended minimum footing width for a 150 kN column (mm) | Typical depth (m) |
|---|---|---|---|
| Black cotton soil (clayey, high shrink-swell) | 100-130 | 600 mm (if treated with lime-stabilised fill) or 800 mm un-treated | 1.0-1.2 |
| Laterite (moderately weathered) | 150-180 | 500 mm (with 2 % cement-lime mix underneath) | 1.2-1.5 |
| Alluvial silt (Ganga basin) | 120-150 | 550 mm | 0.8-1.0 |
| Coarse sand (coastal Karnataka) | 180-210 | 450 mm | 1.0-1.3 |
| Hard rock (granite, basalt) | >300 | 300 mm (rock-anchored strip footing) | 0.6-0.8 |
| Red soil (Chhattisgarh) | 130-160 | 550 mm | 1.0-1.2 |
How I use this table on site: first I get a plate-load test at three random points, take the lowest value, then select the footing width that gives a safety factor of 3.0 against bearing failure. If the required width exceeds 800 mm I switch to a raft footing, because the differential settlement risk becomes unacceptable. Always remember to place a 100 mm layer of 1:4 cement-sand mortar over the sub-grade before laying the reinforcement; it spreads the load and reduces point-load spikes.
Inspection checklist before pouring PCC (Plain Cement Concrete)
Before the concrete truck arrives, run this 12-point checklist. Anything marked "NO" means you stop the pour and fix the issue. I keep a printed copy on the site office and sign off each item.
| # | Item to verify | Pass criteria |
|---|---|---|
| 1 | Trench depth and width as per approved drawing | Measured with steel tape; tolerance +/-10 mm |
| 2 | Bottom of pit free from standing water | Water level <= 0.3 m below bottom; no puddles |
| 3 | Compaction of sub-grade | Proctor density >= 95 % of max dry density |
| 4 | Formwork alignment and plumb | Verticality within 2 mm per 1 m height; no gaps >5 mm |
| 5 | Reinforcement placement | Bar spacing, cover (25 mm for footings) verified with bar-bender gauge |
| 6 | Cleanliness of formwork | Free of oil, mud, loose debris |
| 7 | Shoring/bracing integrity | All bolts tight, no visible deformation |
| 8 | Dewatering equipment operational | Pump running, water discharge away from pit |
| 9 | Concrete mix design approved | Target 25 MPa at 28 days, slump 75-100 mm |
| 10 | Delivery schedule confirmed | Truck arrival time logged; ready to receive within 30 min |
| 11 | Vibration equipment tested | Vibrator head functional, power source verified |
| 12 | Safety gear in place | All workers wearing hard-hat, steel-toe boots, gloves, high-vis vest |
After the pour, I do a quick surface level check with a straight-edge to ensure the top is within +/-5 mm of the design elevation. Then I start curing immediately-cover with a 10 mm thick plastic sheet and spray water twice a day for the first 7 days. Skipping any of these steps adds hidden costs that explode later when you see cracks or settlement.