
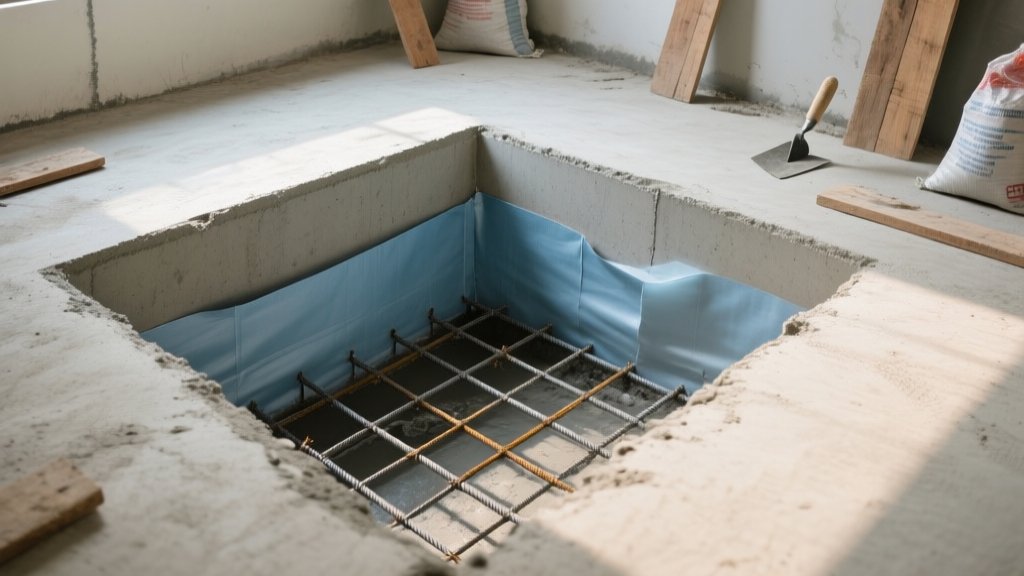
Why a Sunken Slab is Not a Luxury, It's a Necessity
The floor of a bathroom has to carry water, waste pipes and a heavy vanity. A 200 mm deep sunken slab gives you a solid concrete bed that can host the pipework without stressing the super-structure. In our experience, homes that skip this step end up with cracked tiles, water stains on plaster and endless repair bills. The slab also acts as a thermal mass, keeping the bathroom cooler in summer and warmer in winter - a subtle comfort that most homeowners miss until they feel the chill on a cold morning.
IS 456:2000 mandates a minimum clear cover of 20 mm for floor slabs in wet areas. A 200 mm slab, reinforced as per the guidelines below, easily satisfies that requirement while keeping the overall floor height within normal door clearances. IS 10262:2019 prescribes the mix design for the protective screed, ensuring the slab reaches 25 MPa compressive strength within 7 days - a critical factor when the bathroom sees frequent foot traffic and heavy vanity loads.
Depth and Reinforcement - The Numbers That Matter
Typical depth: 200 mm (8 inches). Anything less and you'll struggle to fit a 150 mm pipe plus the required 20 mm slope. For a 12 ft x 10 ft bathroom (~11.2 sqm) the concrete volume works out to about 2.2 cu m, which translates to roughly 5,500 kg of cement, 1,200 kg of sand, and 1,000 kg of aggregate if you follow a C25 mix (1:1.5:3). The reinforcement layout per square metre is shown in the table below; scale it up for the actual area.
| Element | Size | Spacing | Notes |
|---|---|---|---|
| Top mesh | 8 mm TMT | 150 mm c/c | Use TMT from Tata Tiscon or Kamdhenu; price Rs. 6-8 per kg. |
| Bottom mesh | 8 mm TMT | 150 mm c/c | Same grade as top mesh, but place chairs 30 mm from the bottom. |
| Stirrups (if needed) | 6 mm TMT | 200 mm c/c | Only for spans >3 m or when IS 1893 seismic detailing is required. |
All meshes must be tied with 12 mm wire at intersections and supported with plastic chairs. Forget the chairs and you'll get a sagging slab that cracks under tile load. For a 10 sqm bathroom you will need roughly 45 kg of TMT (top + bottom) and 12 kg of 12 mm wire - a total material cost of Rs. 300-400.
Waterproofing Sequence - Do It Right the First Time
Three-stage system that works on every site we've seen:
- Slurry coat - 12 mm cement-sand slurry mixed with 4 kg of Sika® Primer per 20 kg cement. Apply, then cure 24 hrs. Slurry cost Rs. 120-150 per kg of cement plus Rs. 8-10 per litre of primer.
- Bituminous membrane - 2 mm SBS sheet (e.g., Birla's DuroSeal) overlapped 150 mm. Seal joints with hot melt. Membrane price Rs. 120-140 per sq m; extra Rs. 5-8 per sq m for primer on the sheet.
- Protective screed - 25 mm sand-cement screed (C-25 mix) with a 2 mm polymer modifier (e.g., Sika®-FloorGuard). This layer protects the membrane from mechanical damage during floor finishes. Screed cost Rs. 6,500-7,200 per cu m.
If any layer is missed, water will find a path through the joints and ruin the plaster. The most common fraud is to skip the membrane and charge you only for the slurry - a cheap cut that ends in a flooded bathroom. IS 8105:2019 specifies the performance of bituminous sheets; ask the contractor to show the test report.
Dealing with Toilet and Shower Traps - Fill, Seal, Protect
Pipe penetrations must be wrapped in 6 mm chicken mesh, then packed with non-shrink grout (e.g., Sika® Grout-400). The grout should be at least 30 mm thick around the pipe. For the trap area, use lightweight expanded clay aggregate (LECA) instead of brick jelly. LECA costs Rs. 1,200-1,500 per tonne and gives a void-free fill without adding dead load. A 12 sq ft trap zone needs about 30 kg of LECA - roughly Rs. 45-50.
Leave a 15 mm gap between the trap outlet and the slab surface, then pour a 20 mm cement-sand slurry to create a smooth transition for the floor finish. The slurry should be cured for at least 48 hrs before tiling begins, otherwise the grout may heave.
Common Contractor Slip-Ups and How to Spot Them
We've seen these mistakes more than we care to count:
- No slope - the floor should fall 1:60 towards the drain. Use a laser level to check. A 2 m run must drop at least 33 mm.
- Missing waterproofing membrane - a quick visual of the membrane seams will reveal gaps. Pull a thin steel rod across a seam; you should feel resistance from the bitumen.
- No chicken mesh at pipe penetrations - you'll see exposed corrugated pipe at the slab edge when the plaster is removed.
- Pipe ends cut too short - the pipe should protrude at least 30 mm above the slab for proper coupling. Short cuts cause leaks at joints.
- Brick jelly used as backfill - it cracks under load, causing water seepage and a weak slab.
- Improper concrete slump - a slump of 70-100 mm is required for the protective screed. Anything lower leads to honey-combing.
These errors are cheap fixes for the contractor but cost thousands for the homeowner. Add a penalty clause of Rs. 500 per day for each non-compliance item; it forces the crew to stay honest.
Inspection Checklist Before Plastering
Walk the slab with a 2 m straight edge and a level:
- Check that the slab is level within +/-2 mm over 2 m.
- Verify the slope: 10 mm drop over 600 mm runs (1:60).
- Look for any exposed reinforcement - must be fully covered by concrete.
- Confirm the membrane is continuous, seams are sealed, and protective screed is even.
- Test pipe penetrations: push a 10 mm steel rod through the seal; no movement.
If any item fails, halt plaster work and demand remedial action. A plaster job will hide the problem, not fix it. Record each check in a site log signed by the foreman.
Cost Breakdown and Budget Planning
Many homeowners balk at the Rs. 1,200-1,500 per sqm price tag for a sunken slab, but breaking down the cost shows where money goes.
| Item | Unit | Quantity (per 10 sqm) | Rate (Rs.) | Total (Rs.) |
|---|---|---|---|---|
| TMT 8 mm (top + bottom) | kg | 45 | 7 | 315 |
| Plastic chairs | pcs | 120 | 2 | 240 |
| Sika® Primer (slurry) | kg | 8 | 150 | 1,200 |
| Bituminous SBS membrane | sq m | 10 | 130 | 1,300 |
| Protective screed (C-25) | cu m | 0.25 | 6,800 | 1,700 |
| LECA fill | kg | 40 | 2 | 80 |
| Labor (site supervisor + masons) | day | 5 | 2,500 | 12,500 |
| Miscellaneous (wire, sealants) | lump sum | - | - | 1,200 |
| Total | 18,335 |
For a 20 sqm bathroom the total climbs to around Rs. 35,000-Rs. 40,000. Compare that with the typical cost of repairing cracked tiles (Rs. 5,000 per tile) and you see the logic. A single cracked tile replacement can eat up 5-10 % of your total bathroom budget.
IS 10262:2019 guides the mix design for the protective screed. Use a cement content of 350 kg per cu m and a water-cement ratio of 0.45 to meet the required compressive strength of 25 MPa. Add a 0.5 % poly-propylene fibre to improve shrinkage resistance - the fibre costs Rs. 150 per kg.
Choosing the Right Contractor and Material Quality Checks
Ask the contractor for a material sub-mittal that lists brand, grade and batch number for every item. Verify TMT certificates against IS 1786:2008. For waterproofing, request the product data sheet that cites compliance with IS 8105 (bituminous sheets) and IS 15631 (polymer modified mortars).
Sample checklist:
| Check | Acceptable Standard | How to Verify |
|---|---|---|
| TMT grade | Fe 500D | Look for IS 1786 stamp on each bundle. |
| Bitumen sheet thickness | 2.0 +/- 0.2 mm | Measure with a micrometer at three random points. |
| Concrete slump | 70-100 mm | Take a slump test on site for each batch. |
| Cover for reinforcement | 20 mm min (IS 456) | Use a rebar gauge after the pour. |
| Sealant curing time | 24 hrs before backfill | Mark the start time on site log. |
Contractors who refuse to show these documents are likely cutting corners. A small Rs. 500 per day penalty clause for non-compliance forces them to stay honest.
Maintaining the Sunken Slab Over Time
After the floor is tiled, inspect the grout lines every six months. Cracked grout can allow water to seep to the slab surface and create a hidden leak. Apply a thin layer of epoxy grout filler (Rs. 250 per kg) in problem spots. For a 10 sqm bathroom a 2-kg tube is enough for one maintenance cycle.
Annual check of the drain slope with a spirit level saves costly re-grading. If you notice a water pond of more than 3 mm after a shower, re-apply a thin polymer coating (Rs. 120 per litre) over the tiles before re-grouting.
IS 3370:2009 recommends a waterproofing maintenance schedule for high-traffic wet areas. Follow the 5-year inspection cycle; a minor repair at Rs. 2,000 now prevents a Rs. 30,000 slab replacement later. Keep a log of each inspection, date, and corrective action taken.
Choosing the Right Floor Finish Over a Sunken Slab
Tiles are the obvious choice, but not all tiles behave the same on a concrete slab. Porcelain tiles (Rs. 120-250 per sq ft) have lower water absorption (<0.5 %) and are less prone to efflorescence. Natural stone (Rs. 300-600 per sq ft) needs a pre-sealer (Rs. 350 per litre) and a flexible thin-set mortar (IS 15631) to accommodate thermal movement.
Use a cement-sand screed with a 5 mm polymer modifier as the bonding layer. The thin-set adhesive should be a Type 1 modified mortar, applied at a 3 mm thickness. A 10 sq ft area consumes about 1 kg of adhesive, costing Rs. 80-100.
For anti-slip safety, add a 0.5 mm anti-skid granule to the final coat of the screed. The granules cost Rs. 30 per kg; a 5 kg bag covers roughly 30 sq ft.
Thermal Insulation and Sound Dampening for Bathroom Slabs
Concrete transmits cold in winter and heat in summer. A 10 mm XPS board (Rs. 180 per sq ft) placed under the protective screed reduces floor-cold by up to 40 %. For sound, a 12 mm rubber mat (Rs. 90 per sq ft) under the screed cuts impact noise from the vanity and toilet flush.
When you add insulation, increase the slab depth to 220 mm to retain the 20 mm cover. The extra 20 mm of concrete adds about Rs. 500 per sq ft in material and labor, a worthwhile investment in a high-end bathroom where comfort matters.
Common Mistakes in DIY Renovations and How to Avoid Them
Homeowners often try to save money by laying tiles directly over a plain concrete slab without waterproofing. The result is hidden damp that lifts plaster and rots timber fittings. If you must do any work yourself, follow these steps:
- Clean the slab surface with a wire brush and mop; any oil or dust ruins adhesion.
- Apply a primer coat of Sika® Primer at 12 mm thickness; let cure 24 hrs.
- Lay a 2 mm SBS sheet yourself, overlapping seams and sealing with hot melt; use a roller to press out air bubbles.
- Mix a C-25 screed with a polymer modifier; pour to 25 mm and level with a straight edge.
- Wait 48 hrs before tiling; test for moisture with a calcium chloride test (Rs. 250 per kit).
Skipping any of these steps will void the warranty of the tile manufacturer and may breach IS 15631, which requires a waterproofing membrane for wet-area flooring.
Additional Cost Tables for Planning
Below are two extra tables that help you compare material options and track contractor performance.
| Material | Typical Rate (Rs.) | Supplier (example) | Warranty |
|---|---|---|---|
| 8 mm TMT (Fe 500D) | 6-9 per kg | Tata Tiscon, Kamdhenu | 5 years |
| 2 mm SBS Bitumen Sheet | 120-140 per sq m | Birla DuroSeal | 10 years |
| Polymer Modified Screed (C-25) | 6,500-7,200 per cu m | JK Cement | 3 years |
| LECA (expanded clay) | 1,200-1,500 per tonne | Udyog Leathers | Unlimited |
| Epoxy Grout Filler | 250 per kg | Sika® | 2 years |
| Performance Item | Target | Actual | Compliance (Y/N) |
|---|---|---|---|
| Slab levelness (+/- mm) | 2 mm over 2 m | ||
| Slope 1:60 | 33 mm per 2 m | ||
| Reinforcement cover | 20 mm | ||
| Membrane continuity | No gaps >50 mm | ||
| Screed thickness | 25 mm +/-2 mm | ||
| Final tile adhesion | >1 MPa (ISO 10545-4) |
References and Further Reading
Related: Common Construction Mistakes to Avoid During House Building in India 2026
Related: Damp Proof Course and Rising Dampness Treatment in Indian Homes 2026
Related: Centering and Shuttering of Roof Slabs in India 2026 - Complete Guide
Related: Concrete Cover in RCC Construction 2026 - Clear Cover for Slab, Beam, Column, Footing
Related: Building Permits and Approvals Required for House Construction in India 2026
Final recommendation: insist on a full 200 mm sunken slab built to IS 456, IS 10262 and IS 8105, with the three-layer waterproofing system and proper reinforcement. The upfront Rs. 35,000-Rs. 40,000 investment eliminates tile cracking, water seepage and structural repairs for the life of the house.